Prerequisites to Install Calibo Accelerate Orchestrator Agent by Using AWS PrivateLink
To install a Calibo Accelerate Orchestrator Agent on an Amazon EKS cluster by using AWS PrivateLink, complete the following prerequisites:
A dedicated EKS cluster is required to deploy Calibo Accelerate Orchestrator Agent. Consider the following minimum requirements for compute resources as you configure the Kubernetes nodes in the cluster:
EKS Cluster Requirements
-
EKS version 1.24 or later
-
Minimum 2 nodes (Minimum 8GiB RAM and 2vCPU per node)
-
Deploy the EKS cluster in the same region where the Calibo Accelerate platform is deployed. For any queries, contact Calibo Technical Support Team.
-
Create EKS cluster IAM role and Amazon EKS node IAM role as per the AWS guidelines.
Install NGINX Ingress Controller with Network Load Balancer (NLB) in the EKS cluster that you created in prerequisite 1. We recommend using an internal NLB, which ensures that the Ingress Controller is accessible only within the cluster's internal network, enhancing security.
NGINX Ingress Controller Requirements
-
Version 1.3.0 or later
For information about how to install the Ingress-Nginx Controller, see Ingress-Nginx Controller Installation Guide.
-
Configure AWS Secrets Manager in the same AWS account as the Amazon EKS Cluster used for deploying the Calibo Accelerate Orchestrator Agent.
-
Open the Secrets Manager console at https://console.aws.amazon.com/secretsmanager/.
-
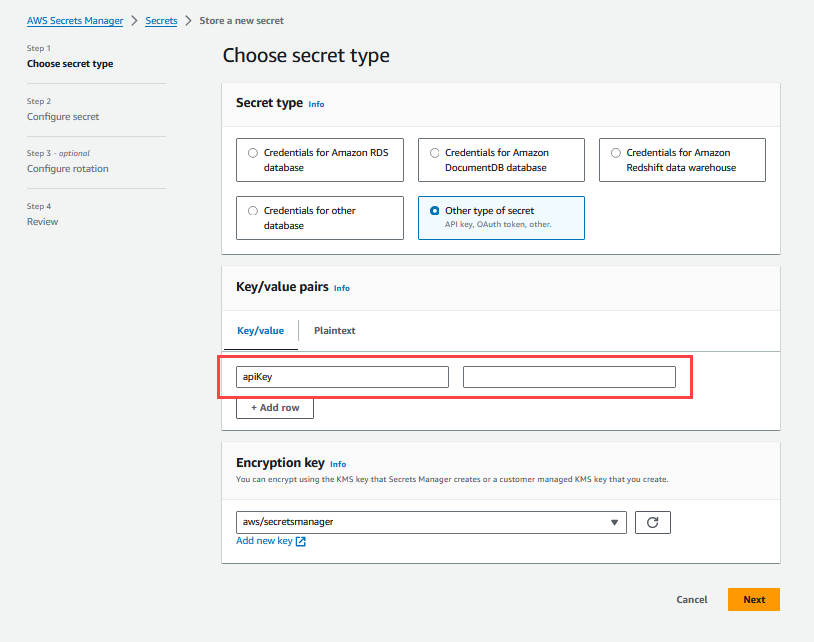
Click Store a new secret.
-
For Secret type, select Other type of secret.
-
In Key/value pairs, add the following key with its value as an empty string.
Key apiKey
Note:
This is a predefined secret used by the Calibo Accelerate Orchestrator Agent. Do not change the key name.Value <empty string>

-
On the next page, provide the secret name. For more information, refer to AWS documentation.
Calibo Accelerate Orchestrator Agent uses this placeholder secret to store its API key. This key is used to authenticate the API requests sent from the Calibo Accelerate platform.
-
Create an IAM policy to allow the Amazon EKS node to resolve secrets from AWS Secrets Manager and to update the API token secret (
apiKey) that you created in the earlier section.Refer to the following sample IAM policy:
Sample IAM PolicyWhile editing this sample IAM policy, replace the following placeholder values with your actual values. This sample policy contains minimal permissions which must not be altered.
Placeholder Value Expected Value <AWS Region>Replace this with your AWS region name. <Account ID>Replace this with your AWS account ID. <Secret Name>Replace this with the name of the tool's secret that you want Calibo Accelerate Orchestrator Agent to resolve. For each tool's secret, add a separate entry in the policy.
"Resource": [
        "arn:aws:secretsmanager:<AWS Region>:<Account ID>:secret:<Secret Name 1>",
        "arn:aws:secretsmanager:<AWS Region>:<Account ID>:secret:<Secret Name 2>",
"arn:aws:secretsmanager:<AWS Region>:<Account ID>:secret:<Secret Name 3>"<secret-name-for-api-token>Replace this with the name of the placeholder secret that you configured in prerequisite 3.
"Resource": "arn:aws:secretsmanager:<AWS Region>:<Account ID>:secret:<secret-name-for-api-token>"
Note:
The sample policy allows the Amazon EKS node on which the Calibo Accelerate Orchestrator Agent runs to update the value of this secret during key rotation.
Copy{
"Version": "2012-10-17",
"Statement": [
{
"Effect": "Allow",
"Action": [
"secretsmanager:GetSecretValue",
"kms:Decrypt",
"secretsmanager:DescribeSecret"
],
"Resource": [
"arn:aws:secretsmanager:<AWS Region>:<Account ID>:secret:<Secret Name 1>",
"arn:aws:secretsmanager:<AWS Region>:<Account ID>:secret:<Secret Name 2>",
"arn:aws:secretsmanager:<AWS Region>:<Account ID>:secret:<Secret Name 3>"
]
},
{
"Effect": "Allow",
"Action": "secretsmanager:ListSecrets",
"Resource": "*"
},
{
"Effect": "Allow",
"Action": "secretsmanager:UpdateSecret",
"Resource": "arn:aws:secretsmanager:<AWS Region>:<Account ID>:secret:<secret-name-for-api-token>"
}
]
} -
Attach this IAM policy to the Amazon EKS node IAM role that you have created while setting up your Amazon EKS cluster.
Allow inbound and outbound connectivity on port 443 to the Amazon EKS cluster on which you deploy the Calibo Accelerate Orchestrator Agent. Make sure that the following services are accessible from your EKS cluster:
-
Docker Hub
Ensure access to Docker Hub. This connectivity is required to download the Orchestrator Agent images from the Docker Hub. -
Amazon S3
Ensure connectivity to Amazon S3 to download Calibo Accelerate Orchestrator Agent Helm charts. -
Calibo Accelerate platform
Ensure the Calibo Accelerate platform is accessible from your EKS cluster. This connectivity is required to establish a secure connection between the Orchestrator agent and the Calibo Accelerate platform.
This procedure needs to be performed in collaboration with the Calibo Technical Support Team.
-
Set up VPC Endpoint Service and attach network load balancer
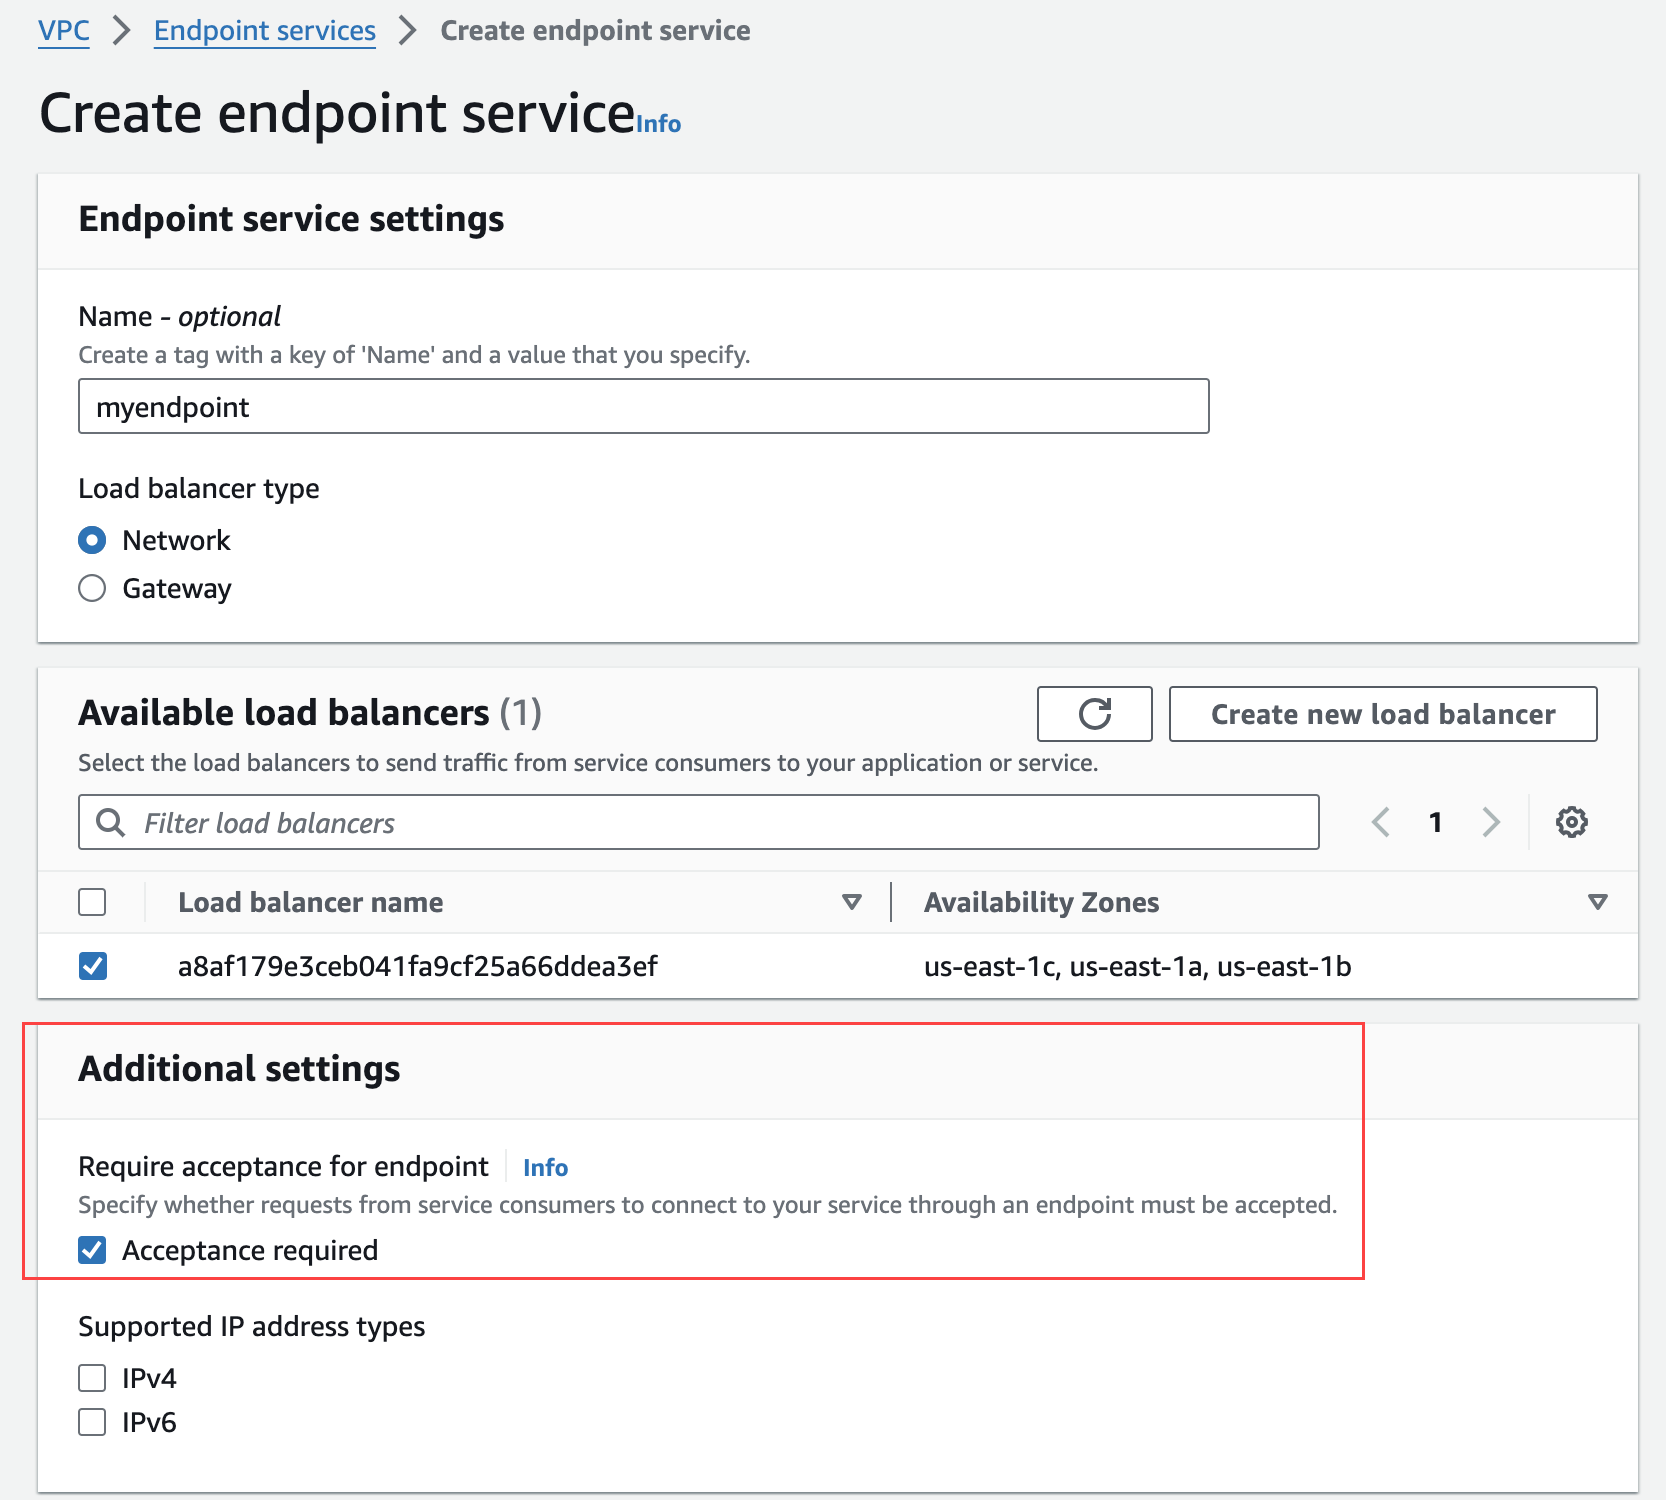
Open the Amazon VPC console, create a VPC endpoint service, and attach the Network Load Balancer associated with NGINX Ingress Controller to it. (Select the Network Load Balancer that you installed as a prerequisite earlier in this topic.)Make sure that in the Additional settings on the Create endpoint service screen, for Require acceptance for endpoint, you select the Acceptance Required box.

For more information on how to configure an endpoint service, refer to the AWS documentation.
-
Share endpoint service name with the Calibo Technical Support Team
After you create the VPC endpoint service, share your endpoint service name with the Calibo Technical Support Team. The endpoint service name looks similar to the following:com.amazonaws.vpce.eu-west-1.vpce-svc-xxxxxxxxxxxxxxxxxx
-
Add Calibo Accelerate account ID to your VPC endpoint service's allowed principals list
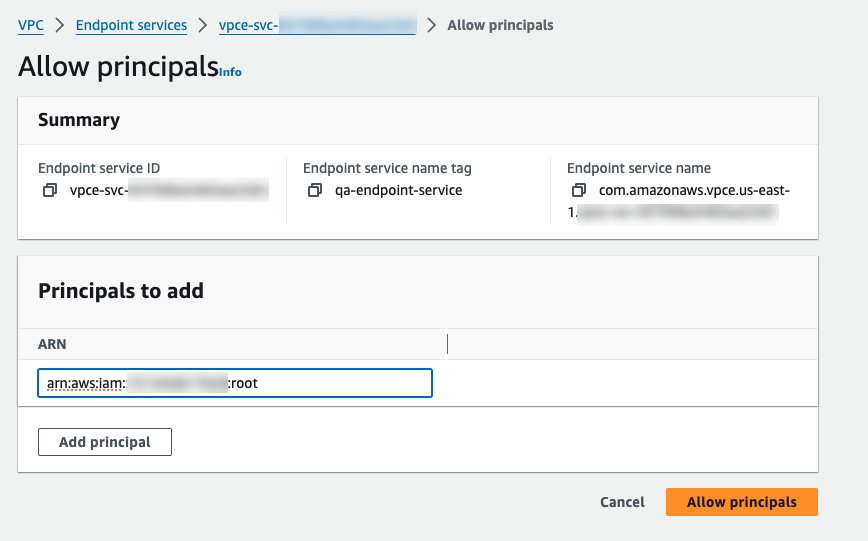
Calibo Technical Support Team will share with you the Calibo Accelerate account (Account ID) principal. Add this principal on the Allow Principals tab for your VPC endpoint service in the following format. Allow this principal to access the endpoint service.arn:aws:iam::<CALIBO-ACCELERATE-ACCOUNT-ID>:root
-
Calibo Team creates endpoint connection request
After you add the Calibo Accelerate account ID to the list of allowed principals, inform the Calibo Technical Support Team.The Calibo team creates an endpoint connection request, which needs your approval.
-
Approve request
Approve the endpoint access request created by the Calibo team in the previous step. -
Calibo team provides AWS PrivateLink endpoint DNS required for agent installation
The Calibo team shares with you the DNS for the Calibo Accelerate Orchestrator Agent. You need to mention this DNS during agent installation. See Steps to Install Calibo Accelerate Orchestrator Agent by Using AWS PrivateLink.
The Calibo Accelerate platform connects with the Orchestrator Agent by using this DNS. The DNS looks similar to the following:vpce-xxxxxxxxxxxxxxxx-xxxxxxxxx.vpce-svc-xxxxxxxxxxxxxxxxx.eu-west-1.vpce.amazonaws.com - Create SSL certificates required for agent installation
Create self-signed SSL certificates by using the AWS PrivateLink Endpoint DNS provided by the Calibo Team or your own custom DNS.
These certificates are required for Calibo Accelerate Orchestrator Agent installation. See Steps to Install Calibo Accelerate Orchestrator Agent by Using AWS PrivateLink.
Depending on whether you use the endpoint DNS provided by Calibo or your own custom DNS record, refer to the respective sections: Create self-signed certificates by using endpoint DNS shared by Calibo team
To create self-signed certificates for AWS PrivateLink endpoint DNS provided by the Calibo team, follow these steps:

Note:
The following steps need to be performed on a Linux machine.
Create the following self-signed certificates for the AWS PrivateLink Endpoint DNS provided by the Calibo Team.
- Create a CA certificate by running the following command in your terminal.
Replace the placeholderTest Cert Authoritywith actual value such as your company name.
The-daysparameter indicates the validity period of the certificate. By default, it is set to 365. You can modify this value. After the specified period, the certificate will expire and you must obtain a new certificate to replace the expired one.Copyopenssl req -x509 -sha256 -newkey rsa:2048 -keyout ca.key -out ca.crt -days 365 -nodes -subj '/CN=Test Cert Authority' Create a server certificate for the AWS PrivateLink endpoint DNS by running the following command. In the command, replace the placeholder
<your_domain_name>with the AWS PrivateLink endpoint DNS provided by the Calibo team in the previous step. Truncate the part before the first dot ('.') and prefix it with '*' as shown in the following example:If the DNS provided by the Calibo Team is
vpce-XXXXXXXX.vpce-svc-XXXXXXXXXX.us-east1.vpce.amazonaws.com, then after truncating and prefixing, it should be*.vpce-svc-XXXXXXXXXX.us-east1.vpce.amazonaws.com."The
-daysparameter in the command indicates the validity period of the certificate. By default, it is set to 365. You can modify this value. After the specified period, the certificate will expire and you must obtain a new certificate to replace the expired one.Copyopenssl req -new -newkey rsa:2048 -keyout server.key -out server.csr -nodes -subj '/CN=<your_domain_name>' && openssl x509 -req -sha256 -days 365 -in server.csr -CA ca.crt -CAkey ca.key -set_serial 01 -out server.crt
- Create a CA certificate by running the following command in your terminal.
 Create self-signed certificates by using custom DNS record
As an example, let us use Amazon Route 53 as the Domain Name System (DNS) service. You can use any DNS service of your choice.
To create self-signed certificates for Amazon Route 53 public domain, follow these steps:
- Create a Route 53 DNS record in a hosted zone and add CNAME as the AWS PrivateLink endpoint DNS provided by the Calibo Technical Support Team. This ensures that your domain is properly mapped to the AWS PrivateLink endpoint.
Create the following self-signed certificates for the Amazon Route53 public DNS that you configured in step 1.
- Create a CA certificate by running the following command in your terminal. Replace the placeholder
Test Cert Authoritywith actual value such as your company name.
The-daysparameter indicates the validity period of the certificate. By default, it is set to 365. You can modify this value. After the specified period, the certificate will expire and you must obtain a new certificate to replace the expired one.Copyopenssl req -x509 -sha256 -newkey rsa:2048 -keyout ca.key -out ca.crt -days 365 -nodes -subj '/CN=Test Cert Authority' Create a server certificate for the Amazon Route 53 public DNS by running the following command.
In the command, replace the placeholder<your_domain_name>with the Amazon Route 53 public DNS that you configured earlier in this procedure.
The-daysparameter indicates the validity period of the certificate. By default, it is set to 365. You can modify this value. After the specified period, the certificate will expire and you must obtain a new certificate to replace the expired one.Copyopenssl req -new -newkey rsa:2048 -keyout server.key -out server.csr -nodes -subj '/CN=<your_domain_name>' && openssl x509 -req -sha256 -days 365 -in server.csr -CA ca.crt -CAkey ca.key -set_serial 01 -out server.crt
- Create a CA certificate by running the following command in your terminal. Replace the placeholder
| What's next? Steps to Install Calibo Accelerate Orchestrator Agent by Using AWS PrivateLink |